Managing Policies
Creating and managing policies includes 3 aspects:
- Creating the Policy: Defines the Policy rules and actions.
- Configuring the scanner rules: Defines which scanners are enabled or disabled.
- Assigning the Policy to a resource: Configures which policies protect which code repositories.
Creating and managing a Policy
Creating and managing a Policy involves defining rules that match finding labels, severity, and/or confidence and assigning actions to be taken when they are triggered.
To get started, navigate to the policy view by clicking the Policy icon in the left-hand menu:

Select the Policies section to load the current policies in the panel to the right.

The Policy view lists all the policies that exist in the account. The first time you access the policies view, there will be only one Policy named Default Policy, which is a built-in BoostSecurity provided default policy that is always present in every account.
When a code repository is scanned, but no explicit policy was created, the Default Policy is applied. The default policy provides rules ensuring any findings are reported on the dashboard's Findings view.
To create a new Policy, go ahead and select the New Policy button on the top right.

The policy designer then opens:
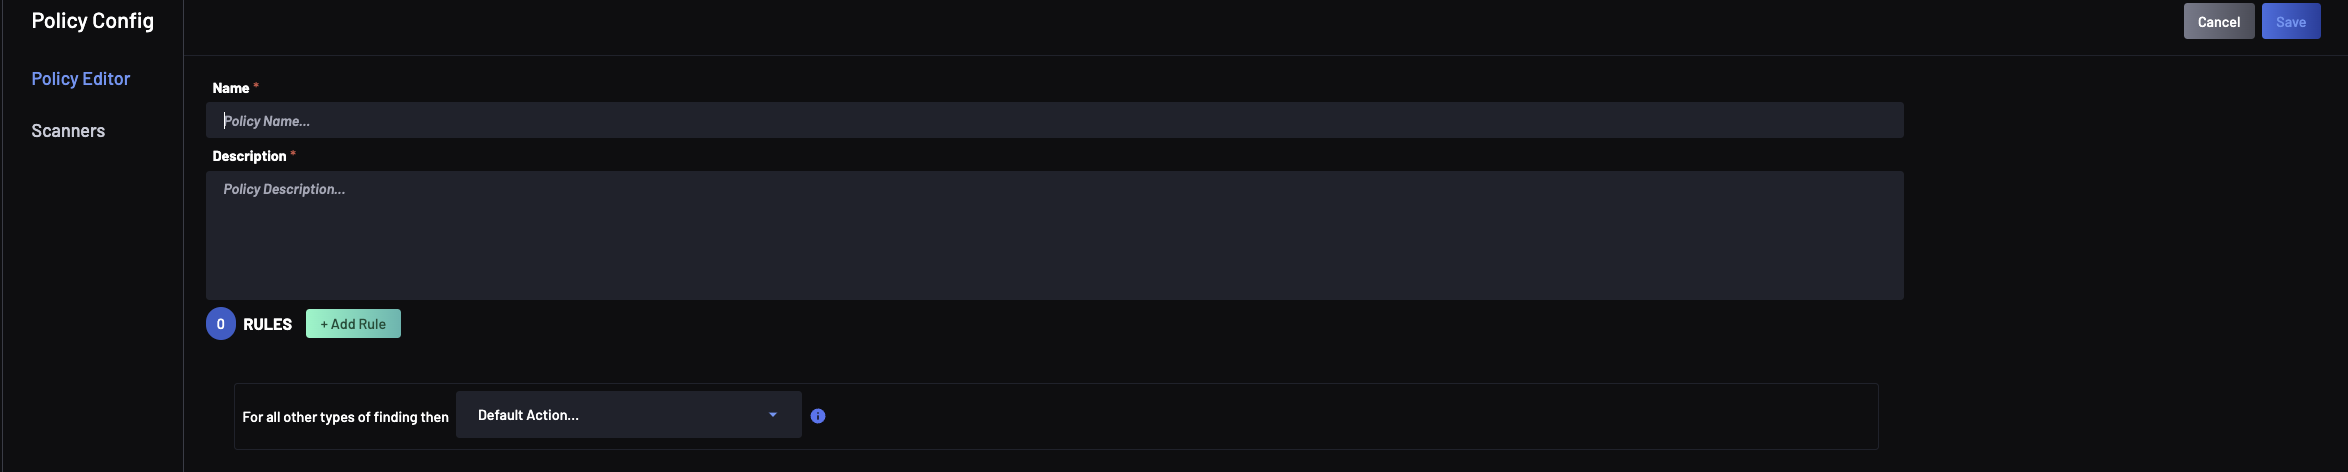
The Policy designer includes 2 sections:
- Policy Editor: Enables adding or editing policy rules, specifying labels, severity and confidence and their associated actions.
- Scanners configuration: Enables configuring which scanners rules are enabled/disabled
The first step in creating a policy is to add policy rules using the Policy Editor. Once that's done, and if required, the scanner's rules can be tuned using the Scanners configuration.
Policy Editor
The Policy editor guides you in designing your Policy. When creating a new policy, there are 3 parts that are mandatory:
- Policy name: The policy name has to be unique, i.e., there shouldn't be another policy that has the same name
- Description: The description will be displayed in the main policy view, with the list of policies.
- Policy rules: There needs to be at least one rule in the policy.
The Policy editor supports a default action to be set, i.e., the action that triggers if none of the rules in the policy match. The default action counts as "at least one rule"; therefore a default action. Note that the default action is mandatory.
At this point, set the default action:
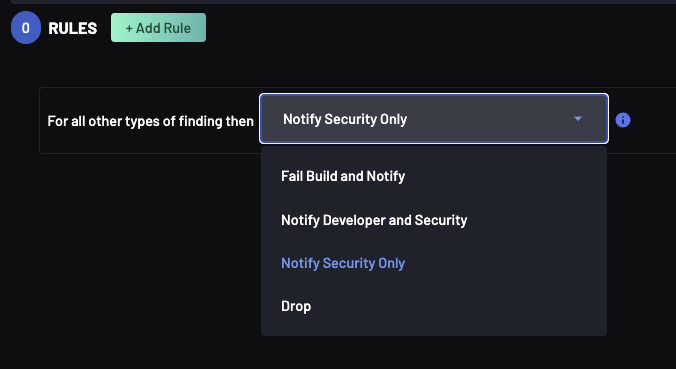
The default action, i.e. for any other types of Findings can be any of the actions defined in Policy Actions.
Once the default action is selected and added to the Policy, the selected action will trigger any finding that does not have a more specific rule.
Policy rules can be added to the Policy to add specific actions to be taken depending on the finding label, severity, or confidence. A rule is a mapping of finding severity and confidence to an action for a finding label. To learn about what finding labels are, refer to Learning about finding labels.
To add a rule, select the Add Rule button. A rules selector appears:
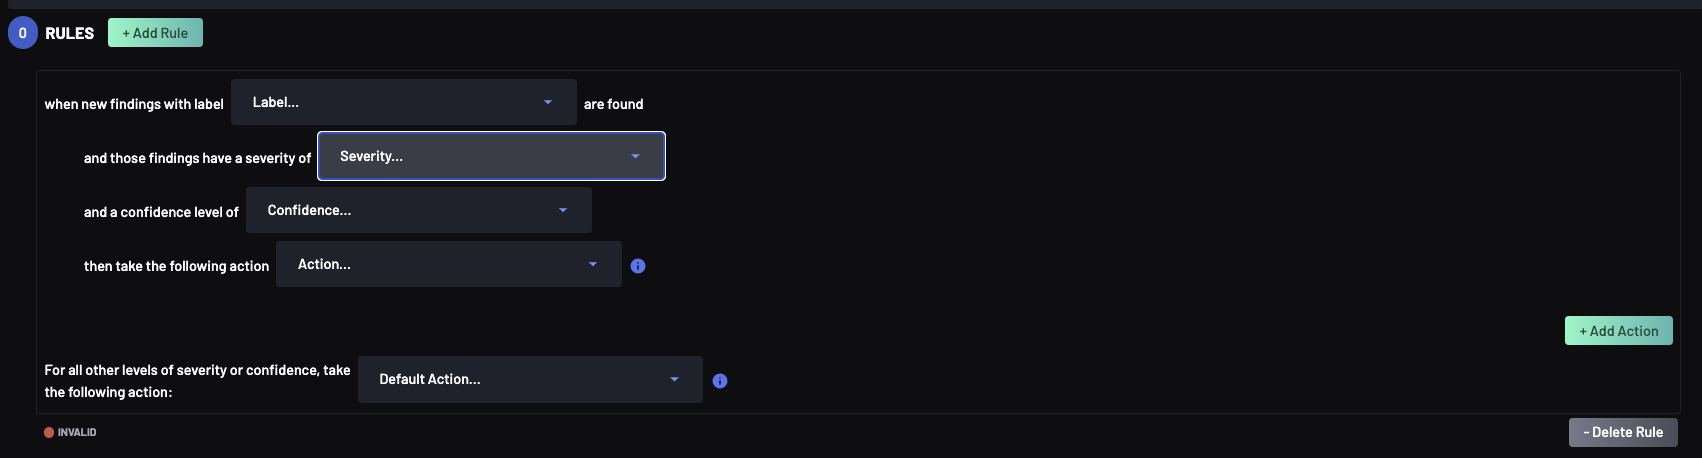
A Policy rule requires 3 parts:
- The findings label to which the rule applies
- One or more severity and confidence tuples along with the action
- The default action for findings of the specified label
Multiple severity, confidence and action tuples can be included in a policy rule. Use the Add Action button to add a severity, confidence, action tuple in a policy rule.
Likewise, multiple Policy rules can be added to a Policy, by selecting the Add Rule to add more rules.
Take the following Policy as an example:
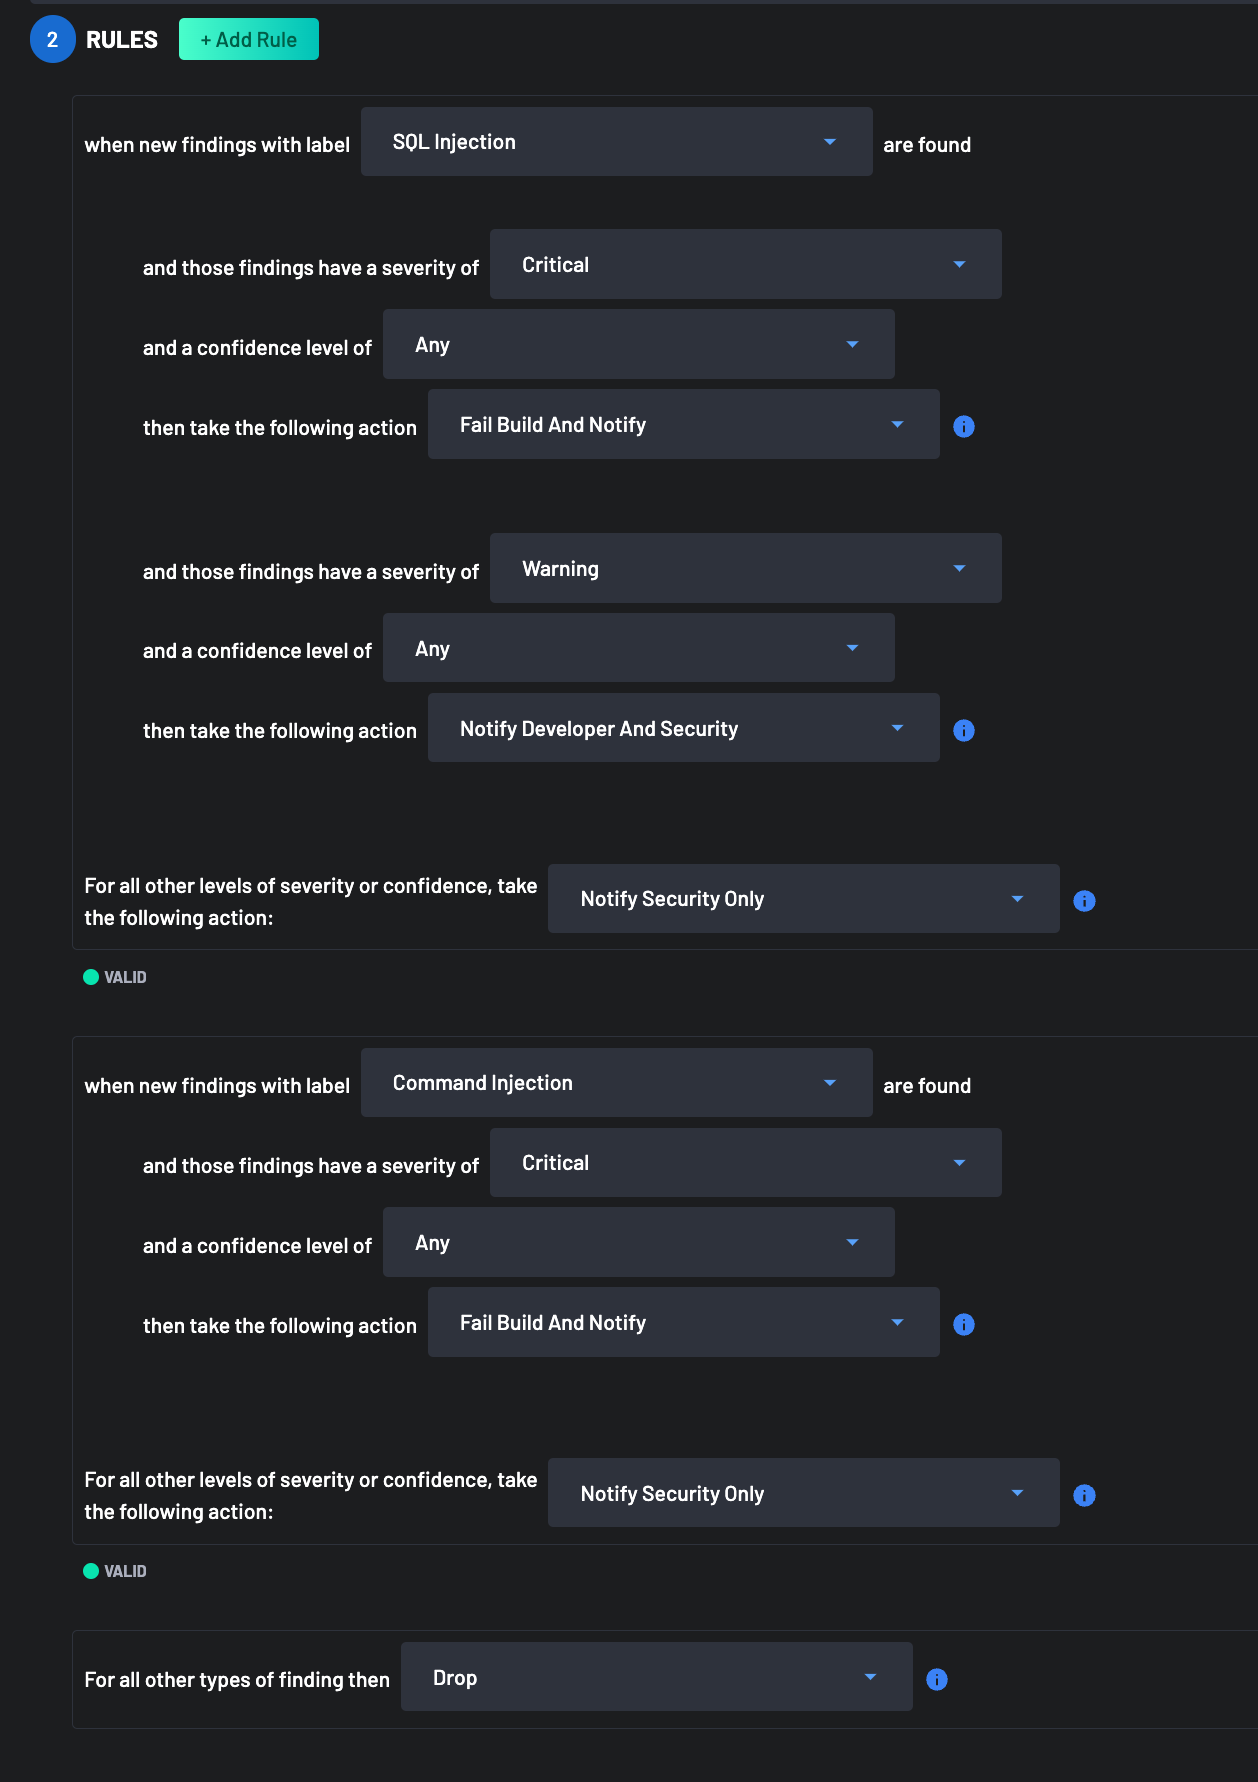
That policy would result into the following behaviour:
- For all Findings with label
SQL Injection:- If the
SeverityisCritical, insert comments in Pull Requests or commits and fail the check, regardless of theConfidencevalue - If the
SeverityisWarning, insert comments in Pull Requests, but don't fail the check, regardless of theConfidencevalue - For all other
SeverityandConfidencevalues, notify security, but don't insert comments in Pull Requests.
- If the
- For all Findings with label
Command Injection:- If the
SeverityisCritical, insert comments in Pull Requests or commits and fail the check, regardless of theConfidencevalue - For all other
SeverityandConfidencevalues, notify security, but don't insert comments in Pull Requests.
- If the
- For all Findings with different label values than
SQL InjectionorCommand Injection, drop the findings
Policy Actions
Policy rules are evaluated from the most strict (i.e., Fail Build and Notify) to the most lenient (i.e., drop). It helps to set up policies that interfere with developers the least and allow you to slowly get more strict.
Several actions can be selected when implementing the policies. The actions and their behavior are described below.
- Fail Build and Notify:
- Comments associated with new violations are inserted as Pull Request comments or text check for the default branch
- The check associated with the BoostSecurity scanners are marked as failed
- If the scan is for the default branch, send a Slack message (if configured)
- Notify Developer and Security:
- Comments associated with new violations are inserted as Pull Request comments or text check for the default branch
- The check associated with the BoostSecurity scanners are marked as success
- If the scan is for the default branch, send a Slack message (if configured)
- Notify Security Only:
- If the scan is for the default branch, send a Slack message (if configured)
- Drop:
- Discards the Findings
Policy rules are evaluated from the most strict (i.e., Fail, Build and Notify) to the most lenient (i.e., drop). It helps to set up policies that interfere with developers the least and allow you to slowly get more strict.
Learning about finding labels
Each scanner's rule that can be triggered has one or more labels associated with it which are selected from the list of labels curated by BoostSecurity. For example OWASP Top 10, SQL Injection and CWE Top 25.
A scanner raises a finding when a rule is triggered. The finding includes all the labels that are associated with the rule. By creating policies with Policy rules matching labels, the policies are always valid regardless of which scanner is used, given labels are not specific to a scanner but rather valid across scanners.
Configuring the scanners rules
Scanners configured to run on your code repositories generate Findings based on the triggered rules.
When creating and defining a Policy, it might be required to disable some rules that don't apply or generate false positives for your code repository. To disable scanner rules for a given Policy, in the Policy designer, select the Scanners tab.
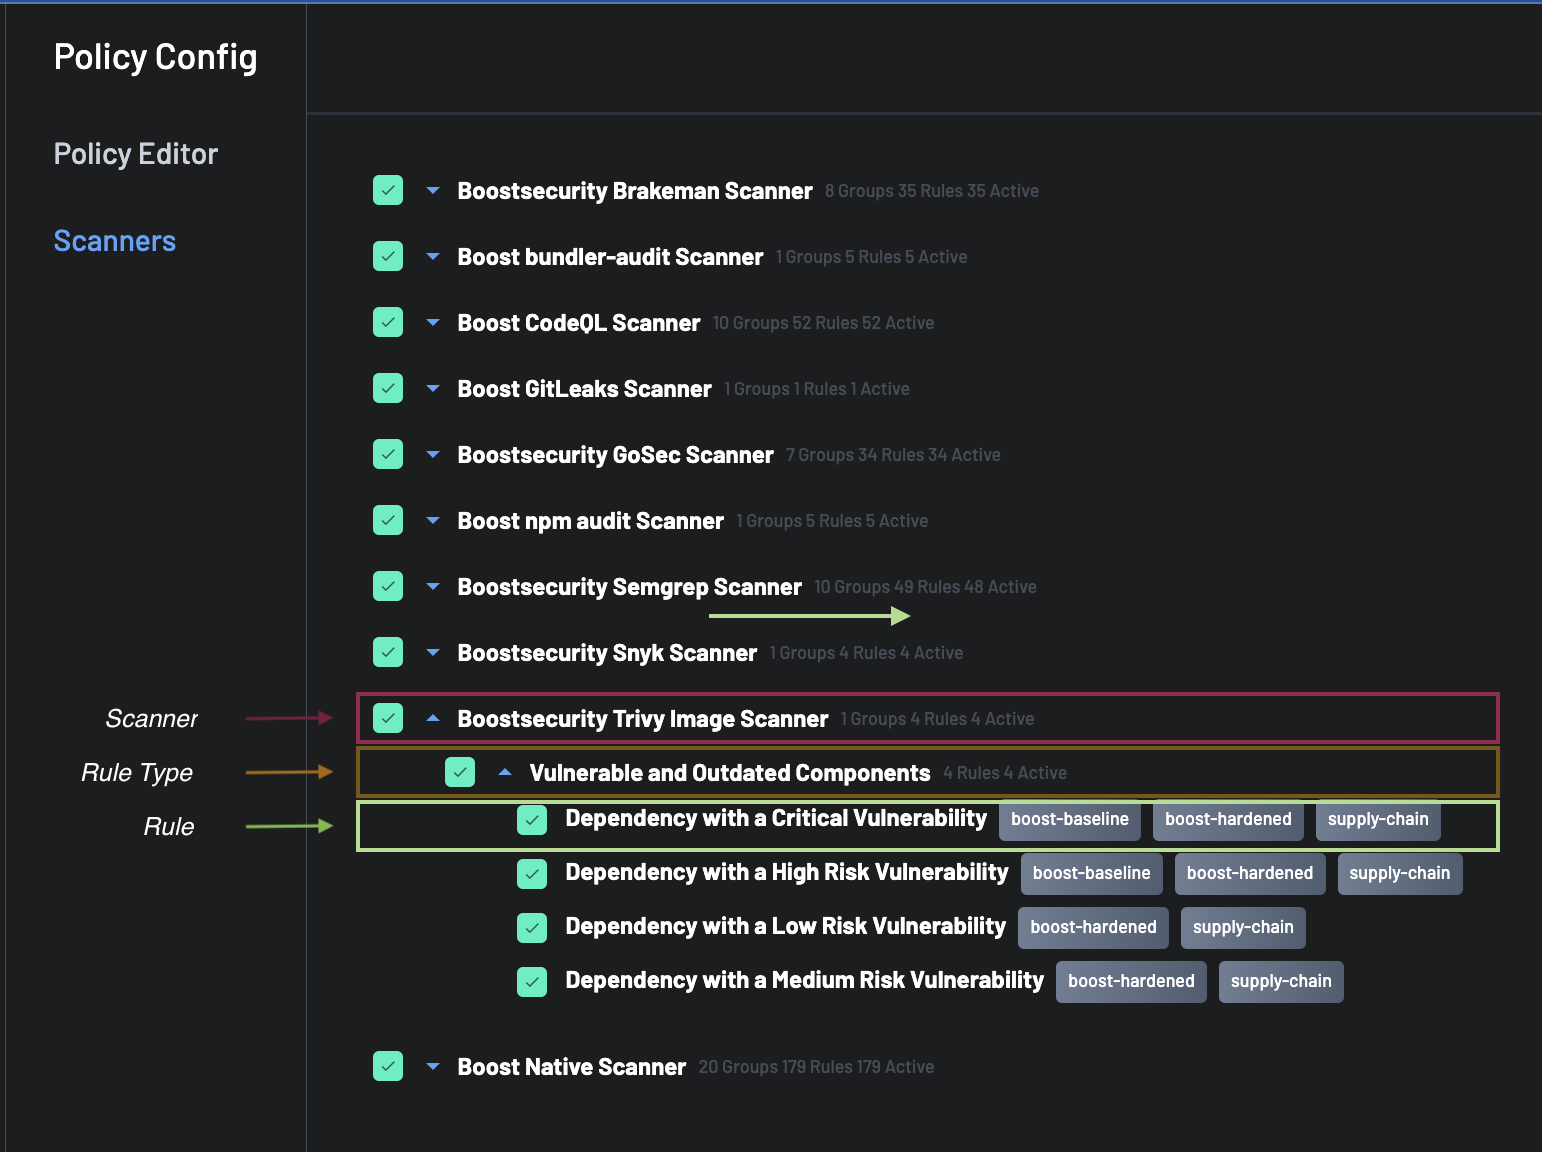
The scanner configuration has 3 levels:
- The scanner name
- The rule type
- The rule
The rule type groups together rules of the same type. Rules can be disabled by unselecting them individually, for all rules in a rule type or in a scanner.
Assigning the Policy to a resource
Once a Policy has been created, it needs to be applied to a code repository to take effect. To configure Policy for the code repositories, go to the Policy > Resources view.
From the view, the list of resources to protect is listed, with the following hierarchy:
- Account
- Organizations
- Repositories
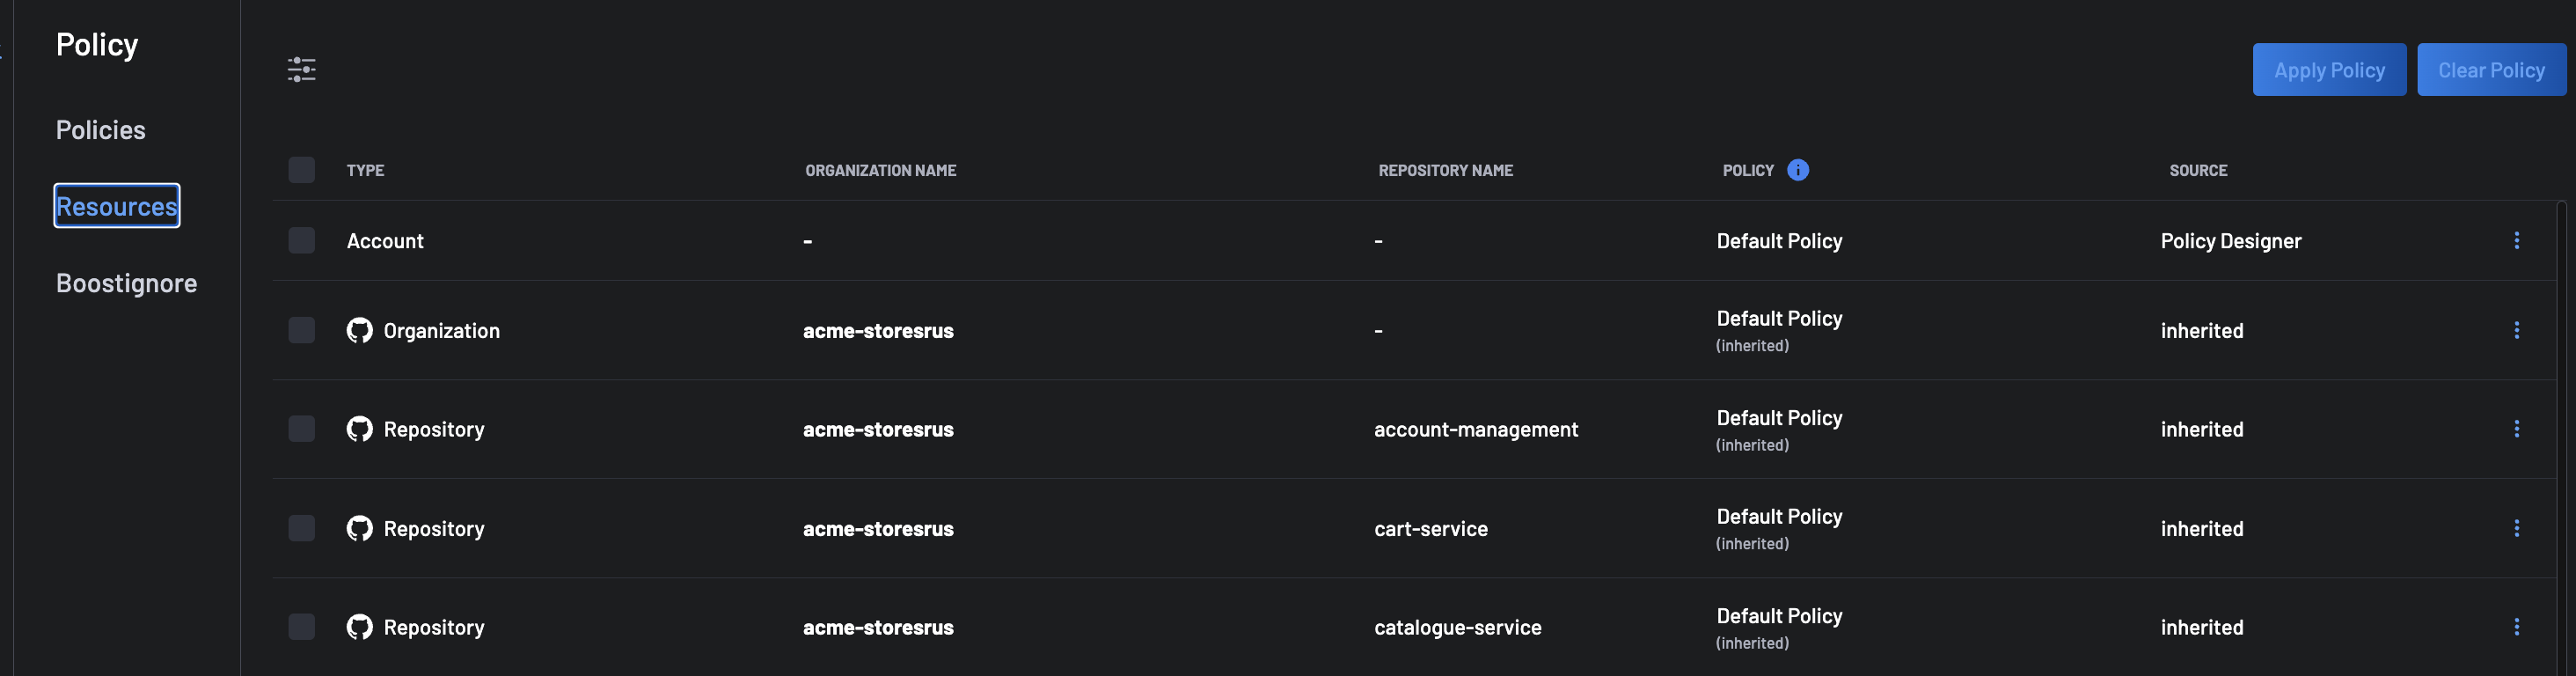
Policies are inherited in the resources's hierarchy. For example, if a Policy is applied to an organization, all repositories in that organization that don't have a Policy applied, inherit the Policy applied to the organization.
By default, the Default Policy is applied to the Account, which also means that by default, Default Policy is inherited by all organizations and repositories.
To apply an existing Policy to a resource, perform the following steps:

- From the menu list, select
Applyto open theApply Policydialog box. The existing policies are listed in theSelect Policymenu list. - Select the required Policy, then select
Applyto apply the Policy to the resource.